12 Ekim 2012 Cuma
"Zenit" ne demek?
Zenit marka fotoğraf makinasının resmi bahanesiyle "Zenit"in kelime anlamı :
Geniş anlamda, zenit belli bir yerin üzerindeki bir noktayı doğrudan belirtmektir. Bu tanımın aşırı geniş olması sebebiyle astronomi,jeofizik ve meteoroloji gibi bilim dallarında, bir noktanın zeniti, o noktada yerçekimi gücünün gösterdiği yönün tersi olan yerel dikey yöndür. Buradan hareketle zenit günlük kullanımda, "zirve", "doruk" gibi anlamlarda da kullanılır. Sözcüğün kökeni Latince cenit'dir ki terimin Batı dillerine temel geçiş noktası Arapça samt yani "(başın üstünden doğru) yol"dur[1].
Bir astronomi terimi olarak zenit, göğün baş hizasında tam tepesinde bulunan noktadır. Karşıdı nadir olan zenit, belirli bir gök cismi tarafından gökte ulaşılan en yüksek noktaya verilen isimdir. Zaman zaman Türkçe gökbilim terminolojisinde başucu noktası karşılığı ile yer alır.
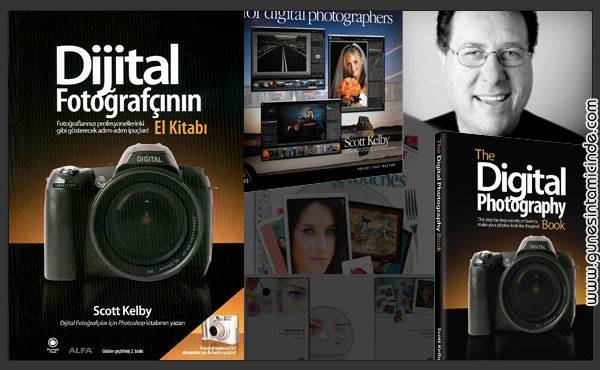
Pop Up Flaş ve Onu Kullanamamak
POP-UP FLAŞ ve onu KULLANAMAMAK
‘ Fotoğraf makinenizin açılır flaşı (pop-up flash) ile bir
fotoğraf çektiyseniz, açılır flaşı özellikler listesine dahil eden fotoğraf
makinesi üreticilerinin nasıl olup da hala yüzümüze bakabildiklerini merak
ediyor olmalısınız.”Açılır flaş” terimi, bence çok güçlü bir pazarlama ifadesi,
halbuki “çirkinleştirici” çok daha orijinal daha betimleyici ve daha doğru bir
tabir olurdu. ‘ bu sözler fotoğrafçılık ve Adobe Photoshop alanında usta olan
Scott Kelby tarafından söylenmiş ve “Dijital fotoğrafçının el kitabı 2.cilt”
kitabında yer almıştır.
Peki neden pop up flaş bu kadar kullanışsız? Tabi ki direk
olarak yüze patladığı için. Amatörce çekilen şipşak vesikalık fotoğraflarda bu
örneğe rastlayabilirsiniz. Işığın küçük bir noktadan direk olarak insanın
yüzüne veya cisme patlaması fotoğrafınızı mahvetmekten başka bir şey değildir.
Yazar Scott Kelby’e göre üreticilerin pop-up flaşı makinalara koymalarının tek
sebebi bu flaşın ne kadar kullanışsız ve berbat olduğunu görmemizi sağlayıp
harici/bağımsız flaş almaya teşvik etmekten başka bir şey değil. Aslında bir
çoğumuz da Scott Kelby gibi düşünüyoruzdur.
Fotoğrafçılığa yeni başlayan arkadaşlar kesinlikle bu flaş ile
fotoğraf çektiklerinde kendilerinde sorun aramasınlar,sadece pop-up flaşı
kullanmaktan vazgeçsinler. Çünkü flaşın DSLR üzerinde konumlandırıldığı yer de
yanlış. Objektifin tam üzerinde. Yani mesafe yok. Scott Kelby’nin dediği gibi “bir
maden işçisinin kaskında yer alan aydınlatma feneri gibi”. Bu durum aynı
zamanda gözlerin kırmızı çıkmasını da size garanti eder. Demem o ki pop-up flaş
değil harici flaş kullanın veya bütçeniz harici flaş almaya yetersizse pop-up
flaşınızı “Rear Sync”* modunda ya da pop-up flaşlara uygun difüzör ile
kullanın.
*Rear Sync modunda : Cismin veya kişinin fotoğrafı
çekilirken flaşın arkayı aydınlatmasını sağlarsınız. Bu durumda zemin siyah
değil olduğu gibi çekilir. Tabi bu modda makinanın titrememesini sağlayın.
Çünkü flaş fotoğraf çekildikten sonra yanar.
Ayrıntılı bilgiler için : “Dijital Fotoğrafçının el kitabı
2. Cilt” – Scott Kelby
10 Ekim 2012 Çarşamba
alpha türk
Profesyonel fotoğrafçılık veya SLR/DSLR makina deyince akla gelen Nikon ve Canon markaları dışında dünya devi Sony'nin de varlığı pek çok insan tarafından bilinmez, unutulur veya küçümsenir. Kimileri de marka önemli değil önemli olan görmek,görebilmektir der, yanlış sayılmaz. Bilinenin aksine dünyada en çok tercih edilen marka da Nikon değil Canon'dur neden bilmiyorum. Gerçi bu yazıda bunlar pek alakalı olmayabilir ama bir Sony DSLR kullanıcısı olarak cihazımdan oldukça memnunum.
Yaklaşık 1 yıldır kullanıcısı olduğum Sony DSLR (a290Y) makinamla bir çok fotoğraf çektim. Şu zamana kadar da zerre şikayetçi olmadım şükür ama fotoğraf çekerken bilen bilmeyen insanların saçma sapan yorumları insanı çıldırtıyor. Yok Sony iyi değil, yok en iyisi Nikon, yok efendim bu ucuz, kaça aldın? Sana ne lan sana ne bırak da bir kaç fotoğraf çekeyim,bir şeyler yakalayayım. Bu serzenişleri içimde yaşarken ve insanlara laf anlatamazken fotokritik sitesinden bir mail ile Türkiye'de Sony kullanıcısının sayısının bir hayli yüksek olduğunu alphaturk.com sitesinin varlığından haberdar olduktan sonra anladım. Saolsun Deniz hoca baya emek harcamış. Bu sitenin bilip bilmeden konuşanlara güzel bir cevap olduğunu görmek beni mutlu etti. Böyle bir siteyi kurdukları için emeği geçen tüm Sony DSLR kullanıcılarına ve Deniz hocaya teşekkür ederim.
Bkz. : http://www.alphaturk.com/
Bkz. : http://forum.alphaturk.com/viewforum.php?f=70
En son çıkan Sony DSLR haberleri ve ürünleri için :
http://www.sony.com.tr/hub/dslr-slt?campaignId=15014210&s_kwcid=sony%20dslr|27898486185
9 Ekim 2012 Salı
Star Trail pozlama
http://www.lightstalking.com/how-to-photograph-star-trailsHow to Photograph Star Trails: The Ultimate Guide By Christopher O'Donnell on 10 Jul 2011 in Guides, Shooting Photographing the night sky can be a surreal experience, and star trail photography is highly rewarding if you have a bit of patience. Those 2 hour long single exposures can turn an otherwise mundane day shot into an otherworldly image.
Racing Stars by Andrew Stawarz, on Flickr When photographing star trails, your goal is to allow your camera to pick up light it wouldn’t normally by using extra long exposures. Working under the night sky means that the amount of available light is severely limited – most likely, you’ll only be able to capture the stars in the sky depending on if there are other light sources around, unless you’re planning on spending a few hours for each exposure.
Behind the Rocks at Night by Scott Ingram Photography, on Flickr With that being said, it’s very important to utilize proper long exposure techniques: locking your mirror, mounting your camera on a secure tripod, and using a remote cable release for your shutter. However, there are additional things to consider when photographing star trails that will set your night images apart from the crowd – how do you get those fantastic lines of light?
The Celestial South Pole by lrargerich, on Flickr There are two methods popular with star photographers – using one very long exposure (long enough to register some noticeable star movement; at least 30 minutes) OR taking many shorter exposures and stacking those images in a way that shows sequential movement. One Long Exposure To capture star trails using one long exposure, there are a couple important things to consider. You need to let as much light into your lens as possible for those stars to register (the why’s of this are explained below) – this means using a fast lens, preferably in the f/2.8 range. When photographing stars under one exposure, you need to do it during a new moon night – meaning that the moon is nowhere to be seen. If you have anything more than a crescent, your exposure will be limited to the 10-minute range because of the ambient light, which won’t do much for star trails. For this kind of photography, darkness is your best friend. Ultimately, you’re aiming for your environment to be illuminated by the stars themselves – yes it’s possible! However, this entirely depends on the length of your exposure. The image below is the result of an 80 minute exposure taken under a new moon – you can see that the foreground is exposed nicely and the star trails are outstanding.
The vortex in the sky by .Bala, on Flickr When calculating your exposure, it would be best to do a shortened test shot so you’re not waiting a ridiculous amount of time just to see if your settings are correct. Many night photographers will jack up their ISO as far as it’ll go and shoot wide open – you’ll rarely find an instance where you’ll be taking a photo shorter than 30 seconds here. Of course the test shot will be entirely unusable due to noise and lack of trails, but it will give you a base to calculate what settings are needed with an ISO of 100. Image Stacking Shorter Exposures An alternative to waiting an hour or more for your exposure to finish is to take sequential images and stack them together in post process to get your star trails. In short, your exposure should be just long enough to register your stars as bright objects in the sky before moving onto the next one. It’s not uncommon to have several hundred images to stack taken over the course of a few hours. Post process software such as ImageStacker and DeepSkyStacker will automatically throw all your images together and produce a stunning star trail. Another benefit to image stacking is that you have all the necessary photos to make a time lapse video – here’s a short clip of what you can accomplish with this method of star trail photography: both the time lapse video and the composite trail image are shown here. Tip: Between shots, try waiting a few seconds to let your sensor cool down a bit as a hot sensor = more digital noise. Aperture: Wide Open or Narrow? A common question – or rather misconception – with star trail photography is why wouldn’t you use a small aperture (say f/8 or above) for a sharper image rather than shoot wide open? You’re already shooting hour-long exposures so the timing isn’t a concern….surely it’s better to have a sharper photo, especially if you have other focal points (foreground interest, etc). The issue with photographing stars is that they move – this is why we want to photograph their trails in the first place. With that in mind, there is a delicate balance to find with your exposure that’s more than just how long your shutter is open. Wider apertures allow for shorter exposure times because they let more light in than narrow apertures. Focus on that last part – they let more light in. Considering that stars are constantly moving, you need to make sure that they’re registered on your sensor before they move – otherwise your star trails will be very dim, perhaps even non-existent depending on your chosen f/stop. Imagine doing a two-hour shoot where your foreground is lit nicely, but your star trails look no more than a slight variation in tones on the night sky. Considering this, it’s a good idea to have a lens that’s capable of very wide apertures – such as f/2.8 or even wider. The wider your aperture, the brighter your star trails will be. Finding the Poles As you may have noticed, several of the example images used here have a circular pattern around a more central location- also known as the north and south poles. This is especially apparent in the video link above. In order to replicate this, you need to locate the poles first and aim your camera for it. If you’re an astronomy beginner like me, this may seem a bit daunting – not to worry though. If you’re shooting towards the north pole, the Polaris (a.k.a. the North Star) is what you’re aiming for – it’s the last star on the handle of the Big Dipper, so if you locate that you’re good to go. The south pole is a bit more difficult to eyeball as there’s no prominent bright star near the pole to help like the Polaris. You can still gather an idea of where it is though by using this free software to help pinpoint the south and north poles – very handy. More Tips Light Pollution – Whether from a nearby city or the street lamp at the end of your driveway, light pollution can greatly affect long exposures. This isn’t necessarily a bad thing though – in fact, it may add to the ambiance of your photo, such as a star trail image that begins during the blue hours. Experimenting with atmospheric light can be a creative way to make a unique star trail image – just be aware that the lighter your sky is, the less contrast your star trails will have. Clear Skies and Dry Air – Obviously you don’t want to photograph star trails under a cloudy sky, but other atmospheric filters can interfere with your night photography – air pollution and humidity being the top annoyances. The best locations for a clear sky would be high up and away from any congested cities, and take on a night with very low humidity.
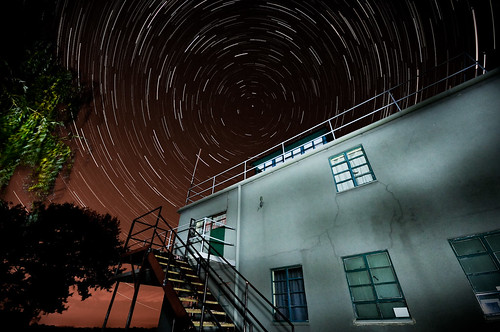
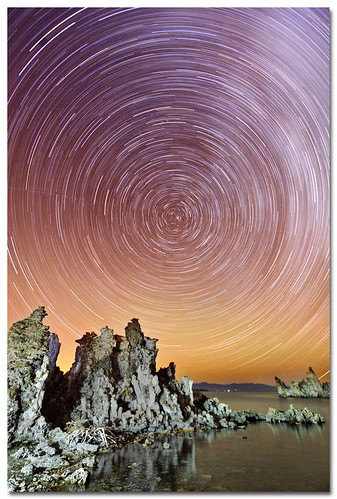
Original web : http://www.lightstalking.com/how-to-photograph-star-trails
Kaydol:
Kayıtlar (Atom)